How to Pair a MEATER Plus
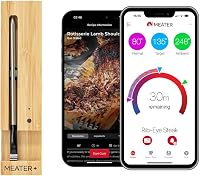
To pair a MEATER Plus, charge the probe in its bamboo charger, then open the MEATER app and start a cook. The app walks you through connecting the probe over Bluetooth, and the charger's built-in repeater extends the range once paired.
On this page (8 sections)
- How do you pair a MEATER Plus step by step?
- Why won't the MEATER Plus pair with the app?
- What should you do before the first pairing?
- How does the charger's Bluetooth repeater affect pairing?
- Which MEATER model fits your cooking?
- What should you check when the app shows the probe but won't connect?
- How do you stay paired through the whole cook?
- The short version of how to pair a MEATER Plus
To pair a MEATER Plus, charge the probe in its bamboo charger, then open the MEATER app and start a cook. The app walks you through connecting the probe over Bluetooth, and the charger's built-in repeater extends the range once paired.
Pairing is a short job you do before the food goes on, not during the cook. Charge first, keep the probe near your phone, and let the app handle the handshake.
How do you pair a MEATER Plus step by step?
Charge, open the app, start a cook, and accept the connection when the app finds the probe. The MEATER app is the only place pairing happens, and it prompts each step in order.
- Dock the probe in the bamboo charger and leave it there until it's charged. A 5-minute charge gives about 2 hours of cook time, and a full first charge makes pairing reliable.
- Install the free MEATER app and sign in.
- Turn on Bluetooth on your phone and keep the phone within a few feet of the charger.
- Open the app and start a new cook. It scans for a nearby probe and lists what it finds.
- Tap your MEATER Plus when it appears and accept the connection.
- Leave the probe in the charger until the app confirms it's connected, then insert it into the meat.
The whole process takes a minute or two once the charge is done. If the app doesn't see the probe, close the app and repeat from step 4.
Why won't the MEATER Plus pair with the app?
A low charge or a competing Bluetooth connection is the usual reason a MEATER Plus won't pair. Fix those two things before you try anything else, because both stop the handshake in the same way.
The probe needs enough power to advertise itself to the phone. If it's been sitting in the charger for weeks, a short top-up may not be enough, so give it a full charge before another attempt.
Bluetooth pairs one device to one phone at a time in many cases. Close the app on a tablet or a partner's phone that already paired with the probe, and turn Bluetooth off and on in your phone settings to clear a stuck connection.
Also check that you started a cook in the app. The app connects to the probe as part of a cook, so it may not find the probe on a plain settings screen.
Our walkthrough on how to use MEATER Plus covers the cook screens in more detail.
What should you do before the first pairing?
Clean and charge the probe before you pair it the first time. A full charge is the single biggest thing that makes a first pairing go smoothly.
Wipe the probe with a damp cloth and dry it fully. The MEATER Plus is dishwasher safe, but the metal end and the ceramic tip should be dry before it goes back in the charger.
Damp contacts sit in a charger that runs on a single AAA battery, and a dry probe makes a cleaner first handshake.
Dock it in the bamboo charger and leave it there for a full charge. The charger uses one AAA battery to top up the probe, so fit a fresh battery if the charger has been in a drawer for a long time.
The included AAA battery is the only power source, so a dead one means the probe never gets its first full charge.
Keep the charger on a counter away from a microwave or a crowded Wi-Fi router during pairing. Those sources add Bluetooth noise and make the first connection harder to complete.
How does the charger's Bluetooth repeater affect pairing?
Pair the probe to the app first, then let the charger's repeater extend the range. The repeater lives in the charger, so keep the charger near the cook and your phone can sit farther away.
The MEATER Plus uses a 100% wire-free probe. The bamboo charger holds a built-in Bluetooth repeater that extends the wireless range, which the maker measures at up to 165 ft in open air.
Start by pairing with the probe in the charger and the charger close to your phone. Once connected, move the charger to the grill or oven side and leave the phone where you'll be watching it.
Walls and metal appliances cut that range. A straight line from the charger to the phone works better than a corner, and keeping the charger out of a closed metal cabinet helps more than moving your phone.
If the app drops the connection mid-cook, bring the phone closer to the charger rather than moving the charger. The probe stays in the meat, so the charger is the easy part to reposition.
What if the charger is too far from the phone?
Move the charger, not the probe. The probe stays in the meat through the whole cook, so the charger is the part you can lift and set down again.
Set the charger on the grill shelf or a counter beside the oven and keep the path to your phone clear. A charger placed behind a closed oven door or inside a metal cabinet loses the advantage of the repeater.
Which MEATER model fits your cooking?
Start with the MEATER Plus if you want the everyday probe and the extended range. The Pro and SE are real options if your cooking runs hotter or your budget is tighter.
The MEATER Plus sits in the middle of the range with dual sensors that read internal temperature up to 212°F and ambient up to 527°F. It's dishwasher safe and runs about 2 hours on a 5-minute charge.
Pairing works the same way as on the other models, so what changes is the cooking, not the setup.
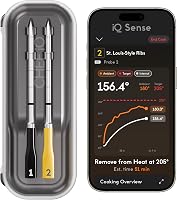
The MEATER Pro pushes the ambient limit to 1000°F so you can leave the probe in for searing and open-flame cooking. It adds five internal sensors and lab-certified calibration to ±0.5°F.
The longer 7.4-inch probe and stainless steel body suit bigger cuts and direct heat.
The MEATER SE is the entry-level pick, with the same dual-sensor setup and app but a plastic charger. The maker lists it as having the same high-quality probe and specs as the MEATER Plus.
Our MEATER Plus review covers how the everyday probe performs, and the MEATER Plus vs MEATER SE comparison shows where the cheaper model gives up features. For high-heat cooks, the MEATER Plus vs MEATER Pro matchup covers the temperature and sensor differences.
What should you check when the app shows the probe but won't connect?
Check the charge, the distance, and whether another cook is already open. A probe the app can see but can't hold is nearly always one of those three.
Start with the charge. Dock the probe in the charger, then try again with the charger and phone a few feet apart.
If the app still lists the probe without connecting, delete the saved probe in the app's device settings and pair it fresh.
Close any cook still open from an earlier session. The app may hold the last cook in memory, and a new cook won't fully start until the old one is finished.
Check that your phone's Bluetooth is on and that airplane mode is off. Also look for a second phone or tablet that paired with the probe earlier, since that device may be holding the connection.
How do you stay paired through the whole cook?
Keep the probe in the meat and the charger near the cook, then let the app's alerts do the work. Once paired, the connection holds as long as the charger stays in range of your phone.
The MEATER app shows internal and ambient temperature at the same time and estimates the finish time and rest time. That's the payoff for pairing correctly, so set the app's alert volume high enough to hear it from another room.
Don't walk out of range to test the connection. If the app warns about signal loss, move the charger closer to your phone rather than opening the oven to check on the probe.
The app's real-time alerts and estimated finish times keep working as long as the probe and charger stay in touch.
After the cook, let the probe cool, clean it, and dock it in the charger. Recharging after every cook means the next pairing is a 30-second job instead of a troubleshooting session.
The short version of how to pair a MEATER Plus
Charge the probe in its bamboo charger, open the MEATER app with Bluetooth on, start a cook, and tap the probe when it appears. That's the whole pairing process, and the charger's repeater handles the range after that.
Pick the MEATER Plus for everyday grilling and oven cooking, the MEATER Pro if you sear over open flame, and the MEATER SE if you want the app and dual sensors at the lowest cost. Pair it once, keep it charged, and the app takes over from there.
Frequently asked questions
How long should I charge a MEATER Plus before pairing?
Charge the probe in its bamboo charger before you start the pairing process. A full charge prevents the disconnects and failed pairing attempts that happen when a probe runs low.
Does the MEATER Plus charger need to be near my phone?
No. The bamboo charger holds a Bluetooth repeater that extends the wireless range, so keep the charger near the cook and your phone can stay farther away in the house.
Give the charger a clear line to your phone where possible.
Can I pair a MEATER Plus while the probe is in the meat?
Pair and connect the probe first, then insert it into the meat. The app needs the probe and charger close during pairing, and an inserted probe in a hot grill or oven makes that handshake harder to complete.
Do I need to pair the probe again for every cook?
The app keeps the probe saved, so a normal cook just needs the probe charged and the app open. You start a new cook and the app reconnects to the probe, and you only repeat full pairing if the connection drops or you change phones.